In this post I will describe the work I did to add auto-zoom functionality to Android-Image-Cropper library.
The goal is a smooth zoom-in/out experience affected by the size of the cropping window. When the user adjusts the crop window to cover less than 50% of the image current total visible sub-area, auto-zoom-in is triggered to zoom-in and center on the relevant cropping image zoomed sub-area so the crop window will cover 64% of it. Similarly, when the crop rectangle is above 65% auto-zoom-out is triggered so zoomed sub-area will be 51% covered.
Steps:
- Using matrix scale type for the cropping image in image view .
- Handle image rotation via matrix transformation.
- Adding auto-zoom-in/out to matrix transformation.
- Smoothing transitions using animations.
- Cropping using invert matrix transformation.
Result:

Step 1 – Use matrix scale type
Originally the library used either CENTER_INSIDE or FIT_CENTER ImageView.ScaleType values to fit the cropping image in the image view, internally image view calculated the required matrix transformation for the image and scale type.
The core of auto-zoom functionality is the manual manipulation of the matrix transformation that in-effect is the zooming and moving of the cropping image area, therefore the first step is to use matrix scale type and set the initial transformation to fit the cropping image in the view (figure 1). Two initial matrix transformations are required: scale and translate (figure 2) .
Scale: Fit in the image inside the image view widget by scaling it relative by the size of the image to the size of the image view. Note, to preserve the aspect ratio of the image the scale value is the minimum between the width and height scale.
Translate: Center the image inside the image view widget by translating it by half of the empty margin left for either width or height, due to scaling to fit at least one of the dimensions matches exactly.
mImageView.setScaleType(ImageView.ScaleType.MATRIX);
Figure 1: Image View widget must be set to MATRIX scale type as we manipulate it manually.
private void  applyImageMatrix(float width, float height) {

    mImageMatrix.reset();

    float imgWidth = mBitmap.getWidth();
    float imgHeight = mBitmap.getHeight();

    // scale the image to the image view (if  fit will 'zoom')
    float scale = Math.min(width / imgWidth,  height / imgHeight);
    mImageMatrix.postScale(scale, scale);

    // move the image to the center of the  image view
    mImageMatrix.postTranslate((width -  imgWidth*scale) / 2, (height - imgHeight*scale) / 2);

    // set matrix to apply
    mImageView.setImageMatrix(mImageMatrix);
}
Figure 2: Applying image matrix with translate and scaling transformations.
Step 2 – Handle rotation
In the original solution rotation was done by modifying the image displayed in the image view, creating a new bitmap for each rotation. A wasteful process that can be corrected now using matrix transformation:
mImageMatrix.postRotate(mDegreesRotated, imgWidth / 2, imgHeight / 2);
Figure 3: Image matrix rotation transformation pivoted on the center of the image.
Adding rotation to the transformations process required changing the sequence and pivot point for all applied transformations as not to cause drift of the image, and update the image rectangle to know its size and location after transformations (figure 4) .
- Move the image to the center of the image view so the center of the image aligns exactly to the center of the image view, the rotation and scale transformation are applied on the center of the image so the cropped image will always remain in the center.
- Rotation transformation is done before scaling because the width/height of the image may change by rotation so it will affect the amount of scaling required.
- Update the final rectangle of the image so we can overlay the cropping UI right on top of it, matching the transformations.
private void  applyImageMatrix(float width, float height) {

    mImageMatrix.reset();

    RectF imgRect = new RectF(0, 0,  mBitmap.getWidth(), mBitmap.getHeight());

    // move the image to the center of the  image view first so we can manipulate it from there
    mImageMatrix.postTranslate((width -  imgRect.width()) / 2, (height - imgRect.height()) / 2);
    mapImageRectangleByImageMatrix(imgRect);

    // rotate the image the required degrees  from center of image
    mImageMatrix.postRotate(mDegreesRotated,  imgRect.centerX(), imgRect.centerY());
    mapImageRectangleByImageMatrix(imgRect);

    // scale the image to the image view, image  rect transformed to know new width/height
    float scale = Math.min(width /  imgRect.width(), height / imgRect.height());
    mImageMatrix.postScale(scale, scale,  imgRect.centerX(), imgRect.centerY());
    mapImageRectangleByImageMatrix(imgRect);

    // set matrix to apply
    mImageView.setImageMatrix(mImageMatrix);

    //  update the image rectangle in the crop overlay
    updateBitmapRect(imgRect);
}

private void  mapImageRectangleByImageMatrix(RectF imgRect) {
    imgRect.set(0, 0, mBitmap.getWidth(),  mBitmap.getHeight());
    mImageMatrix.mapRect(imgRect);
}
Figure 4: Applying image matrix with translate, rotation and scaling transformations, sequence and pivot point is critical.
Step 3 – Adding auto-zoom-in/out
Zoom is essentially scaling beyond the size of the image view resulting in image rectangle that is larger than the image view, and translating so the relevant part of the image is visible. Two parts are required; trigger check to change the current zoom level and update of the image transformation matrix to zoom on specific sub-area of the image.
Zoom trigger check is done when cropping window has been changed (figure 5 ), if its size is less than 50% of the current visible sub-area view size, for both dimensions, the zoom level is increased so the (unchanged) cropping rectangle size is exactly 64% of the new visible sub-area, for the larger dimension. If the size is more than 65% of the current visible sub-area view size, for any of the dimensions, the zoom level is decreased so the cropping rectangle size is exactly 51% of the new visible sub-area, for the smaller dimension.
Two transformation are added to update the image matrix (figure 6 ); scaling by the updated zoom level and translation of the image so the zoomed sub-area is in the center of the image view, within image bounds. Additionally cropping window is updated so it covers the same area that it covered before the zoom-in/out.
This way every time the cropping window is too small we zoom into the sub-area and if the cropping window is too large we zoom out of the zoomed-in sub-area, keeping the cropping window in the center. Thus achieving the required auto-zoom experience.
public void  onCropWindowChanged() {

    int width = getWidth();
    int height = getHeight();
    RectF cropRect =  mCropOverlayView.getCropWindowRect();

    // keep the cropping window size to 50%-65%  of zoomed sub-area
    float newZoom = 0;
    if (mZoom < mMaxZoom &&  cropRect.width() < width * 0.5f && cropRect.height() < height *  0.5f) {
        newZoom = Math.min(mMaxZoom,  Math.min(width / (cropRect.width() / mZoom / 0.64f), height /  (cropRect.height() / mZoom / 0.64f)));
    }
    if (mZoom > 1 &&  (cropRect.width() > width * 0.65f || cropRect.height() > height * 0.65f))  {
        newZoom = Math.max(1, Math.min(width /  (cropRect.width() / mZoom / 0.51f), height / (cropRect.height() / mZoom /  0.51f)));
    }

    if (newZoom > 0) {
        float zoomChange = newZoom / mZoom;
        float xCenterOffset = width / 2 -  cropRect.centerX();
        float yCenterOffset = height / 2 -  cropRect.centerY();
        cropRect.offset(xCenterOffset -  xCenterOffset * zoomChange, yCenterOffset - yCenterOffset * zoomChange);
        cropRect.inset((cropRect.width() -  cropRect.width() * zoomChange) / 2f, (cropRect.height() - cropRect.height() *  zoomChange) / 2f);

        mZoom = newZoom;

        // update the crop window for the new  zoom
        mCropOverlayView.setCropWindowRect(cropRect);

        // update the matrix transformation  after zoom change
        applyImageMatrix(width, height);
    }
}
Figure 5: Auto-zoom-in/out trigger check and execution on change of cropping window.
private void  applyImageMatrix(float width, float height) {

    // ... same previous transformation code

    mImageMatrix.postScale(mZoom, mZoom,  imgRect.centerX(), imgRect.centerY());
    mapImageRectangleByImageMatrix(imgRect);

    RectF cropRect =  mCropOverlayView.getCropWindowRect();

    // reset the crop window offset so we can  update it to required value
    cropRect.offset(-mZoomOffsetX * mZoom,  -mZoomOffsetY * mZoom);

    // set the zoomed area to be as to the  center of cropping window as possible
    mZoomOffsetX = width > imgRect.width() ?  0 : Math.max(Math.min(width / 2 - cropRect.centerX(), -imgRect.left),  mImageView.getWidth() - imgRect.right) / mZoom;
    mZoomOffsetY = height > imgRect.height()  ? 0 : Math.max(Math.min(height / 2 - cropRect.centerY(), -mImageRect.top),  mImageView.getHeight() - imgRect.bottom) / mZoom;

    // apply to zoom offset translate and  update the crop rectangle to offset correctly
    mImageMatrix.postTranslate(mZoomOffsetX *  mZoom, mZoomOffsetY * mZoom);
    cropRect.offset(mZoomOffsetX * mZoom,  mZoomOffsetY * mZoom);
    mCropOverlayView.setCropWindowRect(cropRect);
    mapImageRectangleByImageMatrix(imgRect);

    // set matrix to apply
    mImageView.setImageMatrix(mImageMatrix);

    // update the image rectangle in the crop  overlay
    updateBitmapRect(imgRect);
}
Figure 6: Zoom scale and translation transformations to focus on zoomed sub-area of the cropping image.
Sliding crop area by crop window move
In addition to handling zoom-in/out trigger that occurs when crop window change is complete (user lifting his finger from the touch area), we need to handle scenario where during the cropping window manipulation the edges of the cropping window exceed the edges of the zoomed sub-area in the image view, in this case we need to adjust the zoom offset so the cropping window will be fully in view. There is no need to change the zoom level as we prevent the cropping window size to exceed the visible sub-area during user manipulation.
public void  onCropWindowChanged(boolean inProgress) {

    int width = mImageView.getWidth();
    int height = mImageView.getHeight();
    RectF cropRect =  mCropOverlayView.getCropWindowRect();

    if (inProgress) {
        if (cropRect.left < 0 ||  cropRect.top < 0 || cropRect.right > width || cropRect.bottom >  height) {
            applyImageMatrix(width, height,  false);
        }
    } else {
            // previous code...
        }
    }
}
Figure 7: zoom scale and translation transformation to focus on zoomed sub-area of the cropping image.
private void  applyImageMatrix(float width, float height, bool center) {

    // ... same previous transformation code

    if (center) {
         // set the zoomed area to be as to the  center of cropping window as possible
         mZoomOffsetX = width > imgRect .width()  ? 0 : Math.max(Math.min(width / 2 - cropRect.centerX(), - imgRect .left),  mImageView.getWidth() - imgRect .right) / mZoom;
         mZoomOffsetY = height > imgRect .height()  ? 0 : Math.max(Math.min(height / 2 - cropRect.centerY(), -mImageRect.top),  mImageView.getHeight() - imgRect .bottom) / mZoom;
    } else {
         // adjust the zoomed area so the crop  window rectangle will be inside the area in case it was moved outside
         mZoomOffsetX = Math.min(Math.max(mZoomOffsetX  * mZoom, -cropRect.left), -cropRect.right + width) / mZoom;
         mZoomOffsetY =  Math.min(Math.max(mZoomOffsetY * mZoom, -cropRect.top), -cropRect.bottom +  height) / mZoom;
    }

    // ... same code
}
Figure 8: update zoom offset (x, y) calculations to only move the crop window into view when centering is not required.
Step 4 – Smoothing transitions
To smooth the view transition during zoom-in/out we need to gradually change the image matrix from the starting state, before the zoom-in/out was triggered, to the end state of the new zoomed sub-area view.
First we save the starting state of the image matrix during crop window change event (figure 9 ).
Second, at the final stage of calculating the resulting image matrix, instead of setting it directly on the image view, we use an animation instance that contains the start and end image matrix states (figure 10 ).
Finally, the animation can execute smooth transformation of image matrix (figure 11). The intermediate matrix, represented as 9 cells vector, can be calculated using a simple linear calculation: f(i,t) = start[i] + (end[i] – start[i])*t where i:[0-8] and t:[0-1].
public void  onCropWindowChanged() {

    // ... same code

    if (newZoom > 0) {
        if (mAnimation == null) {
            // lazy create animation single  instance
            mAnimation = new  CropImageAnimation(mImageView);
        }
        // set the state for animation to start  from
        mAnimation.setStartState(mImageMatrix);

        updateCropRectByZoomChange(newZoom /  mZoom);
        mZoom = newZoom;

        applyImageMatrix(width, height, true,  animate);
    }
}
Figure 9: Initialize and set the start state for animation only if zoom is required.
private void  applyImageMatrix(float width, float height, boolean center, boolean animate) {

    // ... same previous transformation code

    // set matrix to apply
    if (animate) {
        // set the state for animation to end  in, start animation now
        mAnimation.setEndState(mImageMatrix);
        mImageView.startAnimation(mAnimation);
    } else {
        mImageView.setImageMatrix(mImageMatrix);
    }

    // update the image rectangle in the crop  overlay
    updateBitmapRect(mImageRect);
}
Figure 10: If animation is required use it to update image matrix instead of setting it directly.
final class  CropImageAnimation extends Animation {

    private final ImageView mImageView;
    private final float[] mStartImageMatrix =  new float[9];
    private final float[] mEndImageMatrix = new  float[9];
    private final float[] mAnimMatrix = new  float[9];

    public CropImageAnimation(ImageView  cropImageView) {
        mImageView = cropImageView;
        mCropOverlayView = cropOverlayView;
        setDuration(300);
        setFillAfter(true);
        setInterpolator(new  AccelerateDecelerateInterpolator());
    }

    public void setStartState(Matrix  imageMatrix) {
        reset();
        imageMatrix.getValues(mStartImageMatrix);
    }

    public void setEndState(Matrix imageMatrix)  {
        imageMatrix.getValues(mEndImageMatrix);
    }

    @Override
    protected void applyTransformation(float  interpolatedTime, Transformation t) {

        for (int i = 0; i <  mAnimMatrix.length; i++) {
            mAnimMatrix[i] =  mStartImageMatrix[i] + (mEndImageMatrix[i] - mStartImageMatrix[i]) *  interpolatedTime;
        }

        Matrix m = mImageView.getImageMatrix();
        m.setValues(mAnimMatrix);
        mImageView.setImageMatrix(m);

        mImageView.invalidate();
    }
}
Figure 11: Animation calculating and setting intermediate image matrix using start/end state vectors.
Step 5 – Cropping
Finally when it's time to crop the image, the cropping window needs to be translated from the image view coordinates, affected by all the image matrix transformation, back to source image coordinates. Fortunately, math is beautiful, having the image matrix used to transform the source image to the sub-area used in image view we can invert it and get the matrix that transforms the cropping window coordinates back to source image (figure 12 ). We are using 4 points coordinates and not a rectangle due to non-straight angle rotation, so the cropping rectangle is calculated from the 4 points that either is the required area or contains it within if non-straight rotation was used (figure 13).
RectF  cropWindowRect = mCropOverlayView.getCropWindowRect();

float[] points =  new float[]{
        cropWindowRect.left,  cropWindowRect.top,
        cropWindowRect.right,  cropWindowRect.top,
        cropWindowRect.right,  cropWindowRect.bottom,
        cropWindowRect.left,  cropWindowRect.bottom
};

Matrix  inverseMatrix = new Matrix();
mImageMatrix.invert(inverseMatrix);
inverseMatrix.mapPoints(points);
Figure 12: Retrieving the 4 points of the cropping rectangle in the original bitmap using inverse matrix.
public static Rect  getRectFromPoints(float[] points, int imageWidth, int imageHeight) {
    int left = Math.round(Math.max(0,  Math.min(Math.min(Math.min(points[0], points[2]), points[4]), points[6])));
    int top = Math.round(Math.max(0,  Math.min(Math.min(Math.min(points[1], points[3]), points[5]), points[7])));
    int right = Math.round(Math.min(imageWidth,  Math.max(Math.max(Math.max(points[0], points[2]), points[4]), points[6])));
    int bottom =  Math.round(Math.min(imageHeight, Math.max(Math.max(Math.max(points[1],  points[3]), points[5]), points[7])));
    return new Rect(left, top, right, bottom);
}
Figure 13: Getting the straight angle bounding rectangle of the 4 cropping window points.
Crop rectangle from source image
Due to Android API restrictions we need to handle differently if the source image is available as bitmap object or loaded (with sampling) from URI. If we crop a bitmap object directly we can crop and rotate it using a single operation (figure 14), otherwise , we first load (decode) the cropped area and then rotate the loaded bitmap (figure 15). We could have just fully loaded the source image to bitmap and use the same approach for both methods, but that would have required more bitmap memory allocation and the possibly reaching device limits, loading only the required crop area reduces the allocated bitmap memory thus improving performance and although reaching limits is still a possibility it should be less common.
public static  Bitmap cropBitmap(Bitmap bitmap, float[] points, int degreesRotated) {

    // get the rectangle in original image that  contains the required cropped area (larger for non rectengular crop)
    Rect rect = getRectFromPoints(points,  bitmap.getWidth(), bitmap.getHeight());

    // crop and rotate the cropped image in one  operation
    Matrix matrix = new Matrix();
    matrix.setRotate(degreesRotated,  bitmap.getWidth() / 2, bitmap.getHeight() / 2);
    Bitmap result = Bitmap.createBitmap(bitmap,  rect.left, rect.top, rect.width(), rect.height(), matrix, true);

    return result;
}
Figure 14: Crop and rotate bitmap instance using single 'createBitmap' operation, then execute second cropping if required for non-straight angle rotation.
public static  Bitmap cropBitmap(Context context, Uri loadedImageUri, float[] points, int  degreesRotated, int orgWidth, int orgHeight) {

    // get the rectangle in original image that  contains the required cropped area (larger for non rectengular crop)
    Rect rect = getRectFromPoints(points,  orgWidth, orgHeight);

    ContentResolver resolver =  context.getContentResolver();
    InputStream stream =  resolver.openInputStream(loadedImageUri);

    BitmapRegionDecoder decoder =  BitmapRegionDecoder.newInstance(stream, false);
    Bitmap bitmap = decoder.decodeRegion(rect,  new BitmapFactory.Options());
    decoder.recycle();
    stream.close();

    // rotate the decoded region by the  required amount
    Matrix matrix = new Matrix();
    matrix.setRotate(degreesRotated);
    Bitmap newBitmap =  Bitmap.createBitmap(bitmap, 0, 0, bitmap.getWidth(), bitmap.getHeight(),  matrix, false);
    bitmap.recycle();

    return bitmap;
}
Figure 15: Load image cropped area and then rotate in separate operation, then execute second cropping if required for non-straight angle rotation.
Handle non-straight angle rotation
In case the image was rotated by a non-straight angle (i.e. not 0, 90, 180 or 270) the cropping rectangle that was used in cropping the source image (figure 14/15) is larger than the actual required rectangle (figure 16) because it is impossible to crop non-rectangular area using Android API. So the result of 'cropBitmap' methods, in this case, is the red rectangle in figure 16 and we need to add conditional second cropping on the result bitmap before it is returned (figure 17). We could have first rotated the fully loaded source image and then cropped the required rectangle, but this would, again, require more bitmap memory allocation, first cropping is more complicated but may have significant performance improvement.
To calculate the required cropping rectangle inside the intermediate rectangle (red) we need to use a bit of trigonometry magic, let α be the rotation angle, (x[i], y[i]) the 4 coordinates of the cropping rectangle in source image:
Left: o1 = sin( α ) * (y3 – y[0])
Top: o2 = cos( α ) * (y[0] – y1)
Width: w = (y[0] – y1) / sin( α )
Height: h = (y3 – y[0]) / cos( α )
New we have the required (white) cropping rectangle inside the cropped rectangle (red) from the first step (figure 18) .
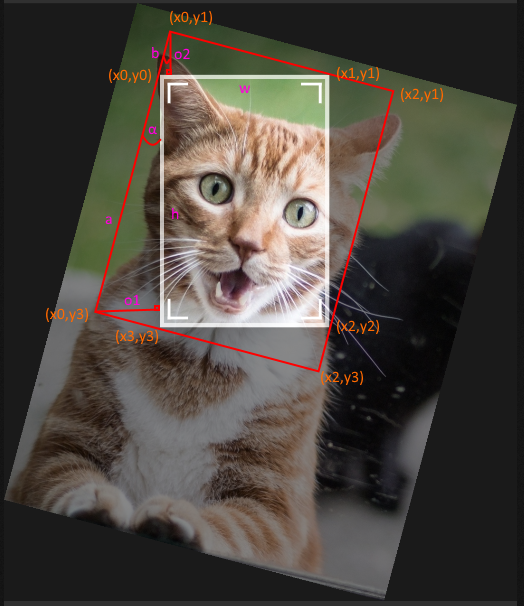
Figure 16: Cropping non-straight angle rotation, red rectangle is the bounding first cropping area in the source image.
if (degreesRotated  % 90 != 0) {
    // extra crop because non rectangular crop  cannot be done directly on the image without rotating first
    bitmap = cropForRotatedImage(bitmap,  points, rect, degreesRotated);
}
Figure 17: Second cropping required for non-straight angle rotation appended to 'cropBitmap' methods from figure 14 and 15.
private static  Bitmap cropForRotatedImage(Bitmap bitmap, float[] points, Rect rect, int  degreesRotated) {
    int adjLeft = 0, adjTop = 0, width = 0,  height = 0;
    double rads =  Math.toRadians(degreesRotated);
    int compareTo = degreesRotated < 90 ||  (degreesRotated > 180 && degreesRotated < 270) ? rect.left :  rect.right;
    for (int i = 0; i < points.length; i +=  2) {
        if (((int) points[i]) == compareTo) {
            adjLeft = (int)  Math.abs(Math.sin(rads) * (rect.bottom - points[i + 1]));
            adjTop = (int)  Math.abs(Math.cos(rads) * (points[i + 1] - rect.top));
            width = (int) Math.abs((points[i +  1] - rect.top) / Math.sin(rads));
            height = (int)  Math.abs((rect.bottom - points[i + 1]) / Math.cos(rads));
            break;
        }
    }
    Bitmap bitmapTmp = bitmap;
    bitmap = Bitmap.createBitmap(bitmap,  adjLeft, adjTop, width, height);
    bitmapTmp.recycle();
    return bitmap;
}
Figure 18: Second cropping for non-straight angle rotation, calculating the cropping rectangle using trigonometry.
Final words
I have omitted some boilerplate code from the snippets for clarity. Some possible configurations, initializations and state change scenarios requires a little bit more edge case handling.
Android bitmap API limitation is a real problem as it forces more than required bitmap memory allocation and contain bugs (BitmapRegionDecoder) that may require the loading of source image in full. So I may be checking an option of going native for bitmap loading and cropping, may be interesting.
Handling of non-straight angle rotation is not fully complete as the cropping window can exceed the bitmap boundaries, it’s a complicated scenario to handle, especially for circular cropping shape, so I left it for next version.
It was fun, I hope people will find it useful.
