tl;dr
- Wanting to play Fallout 4 in VR, I quickly realized I must use mods; after trying out the 3 available modlists, “GingasVR’s Essentials Overhaul” was the best.
- After playing “vanilla” Gingas modlist for 10+ hours, I started noticing changes I didn’t like, but customizing the mods and gameplay was hard and error-prone.
- After spending far too much time, I finally managed to customize the gameplay to my liking by removing ~30 mods, adding ~6, and tweaking INIs.
- In my humble opinion (IMHO), the result is focused on gameplay, closer to vanilla, and better balanced.
- I would like to offer the steps I took to customize the modlist, as a guide for others.
- For comments and questions, please see my Reddit post.
HD Update 2025
- GingasVR updated the modlist in August 2025.
- Most of my guide is still relevant on how to customize a modlist.
- I’ve added, removed, and updated recommendations where necessary.
Personal Recommendation
Since writing this guide and spending more time playing, I’ve switched to using the Mad God Overhaul classic profile together with my Fixes and Customization Guide. It’s my personal recommendation for the most balanced Fallout 4 VR experience, more stable and tested mods, and it provides an excellent baseline for customizing to your own taste, since it includes only a minimal number of game-changing mods.
All the Drama!
Gingas decided that this guide was a front to her work and personally attacked me over it (see example 1, example 2). I have nothing to hide; I am proud that all of my work is public and fully credited here, on GitHub, and on Patreon. If you are interested in my response, I addressed it thoroughly in this comment. I believe what Gingas is doing is petty and despicable; moreover, she is violating the rules by bootlegging FRIK (and possibly XDI, and who knows what else) in her mod list.
What saddens me most is that I have invested over 1,000 hours in FRIK over the past year. Despite running a popular mod list, Gingas has never reported a single bug. Imagine how much better the game could be if we all directed our efforts more productively.
Table of Contents
- Forward
- Zero to Custom Game Walkthrough
- Customization Guide: INIs
- Customization Guide: Mods
- Recommended Changes: Mods
- Recommended Changes: Graphics
- Recommended Changes: Survival
Forward
Why “GingasVR’s Essentials Overhaul”?
- Vanilla Fallout 4 VR is barely playable. Modding Fallout 4 VR from scratch is quite complicated and requires a significant time investment to make mods play well together.
- The Mad God Overhaul modlist’s focus on graphics leaves gameplay lacking, and framerates end up in the toilet (see my guide to fix it).
- The F4FEVR modlist feels like it’s in an “alpha” phase, with many mod compatibility issues.
- GingasVR’s modlist provides the best gameplay fundamentals, smooth performance, and solid mod compatibility.
Why Customize GingasVR’s Modlist?
- Some mods are buggy.
- Some mods disrupt the game balance.
- Some mods simply aren’t to your taste.
- Some mods you’d expect are missing.
- You want that perfect game tailored to you—without starting from scratch.
Why Changing Mods Can Break Everything?
The main reason you usually can’t just add/remove a mod from the list is the conflict between different mods that change the same record and the conflict resolution patch that merges them. Removing a mod that a patch depends on will result in the patch not loading, thus breaking most of the mods the patch was created for. Adding a mod overrides some records in the patch and again breaks other mods. In GingasVR’s Essentials Overhaul, the SmashPatch depends on 159 mods—removing any of them will break the patch and 41 mods that use it for conflict resolution.
For details, see the Customization Guide: Mods section.
Zero to Custom Game Walkthrough
First of all, you need to follow Gingas’s guide to install a clean copy of Fallout 4 VR in a non-Program Files location, get the flat version DLCs, and cleanly install Gingas’s modlist using Wabbajack.
A recommended folder structure would be:
.
└── Fo4VR                  (outside "Program Files")
    ├── Steam                  (where vanilla Fo4VR is installed)
    ├── Wabbajack              (where Wabbajack.exe is run)
    └── VR Essentials Overhaul (where you install the modlist via Wabbajack)
Update 2025: Gingas has streamlined the installer, including the DLC downgrades. It should be a breeze now.
Customize for New Game
Recommendation: Back up the ...\Fallout VR Essentials folder for easy rollback or comparison as you update/add/remove mods. It’s safer than just creating a new profile, since changes to mods and mod specific INI files are persistent between profiles. With separate folders, you can quickly copy your save into a clean modlist to compare and contrast against it.
- Customize INIs.
- At a minimum, set
iVRUIRenderTargetHeight/Width.
- At a minimum, set
- Customize Mods that affect new games.
- FRIK, Stalkers, and Sim Settlements are the most important to update/remove.
- I suggest removing additional weapons, scopes, backpacks, etc., as removing mods mid-game can corrupt saves. (Those can be added later if you want to experiment.)
- Graphics and smaller tweaks are probably okay to leave for later, if you prefer.
- Start a New Game
- I played through the tutorial, and with full-body mode enabled, it felt like a new experience.
- With the Stalkers mod removed, there’s no reason to rush anymore.
Post Game Start Mods Config
Follow Gingas’s Holotape Settings and MCM Settings.
Customization Guide: INIs
.ini files are simply game settings in a text-based format. Some, but not all, are available in the in-game settings UI and will be written into fallout4prefs.ini upon saving. Meanwhile, fallout4custom.ini contains custom advanced settings that are more powerful. Some complex mods (like FRIK) also contain .ini files—usually in a mods\<mod name>\F4SE\Plugins folder—that are worth checking out.
Navigate to ...\Fallout VR Essentials\profiles\FO4VR Essentials - (Original). This is where the game’s custom INIs and your saves reside. Open fallout4custom.ini.
When adding values to INIs, make sure not to duplicate groups or values. For example, if a [Display] group already exists, you add to that existing group. If uPipboyTargetHeight is present, edit that line rather than adding a second one. The order doesn’t matter.
For alternate suggestions, check out “Florine’s Fallout 4 VR” or “dijkpah’s FO4VR setup.”
Makes most UI text (menus, notifications, dialog, etc.) much crisper. Details in the Graphics section.
[VRUI]
iVRUIRenderTargetHeight=2048
iVRUIRenderTargetWidth=2048
This makes the interact/loot interface smaller and lower in relation to your hands, making it less intrusive and more immersive.

Easy to compare to “TAKE”/”TRANSFER,” which I haven’t found a way to move/scale/hide. If you know how to remove/scale them, PLEASE let me know!
[VRUI]
fHMDHUDStatusScale=0.5
fHMDHUDInfoScale=0.5
fHUDLootScale=0.5
fHUDLootPitch=0.0
fHUDLootX=-10.0
fHUDLootZ=-4.0
fHUDLootY=0.0
fInteractRolloverPrimaryScale=1.0
fInteractRolloverSecondaryScale=1.0
fInteractRolloverPrimaryX=-6.0
fInteractRolloverPrimaryY=-15.0
fInteractRolloverPrimaryZ=-3.0
fInteractRolloverSecondaryX=5.0
fInteractRolloverSecondaryY=-15.0
fInteractRolloverSecondaryZ=-5.0
Additional steps:
- Delete or rename
...\VR Essentials Overhaul\mods\FallUI - HUD VR\M8rLargerRollover.ini. - Open
...\VR Essentials Overhaul\mods\FallUI - HUD VR\MCM\Settings\FallUI.ini, and at the bottom, changefScaleRolloverButtonto0.3.
Less sensitive joystick rotation in settlement workshop.
[Workshop]
fItemRotationSpeed=0.3
Makes movement direction relative to the controller rather than the head. It’s the default in Fo4VR, and personally, I think it’s better since you can walk straight while looking around.
[VRInput]
bUseWandDirectionalMovement=1
Customization Guide: Mods
To oversimplify, one big problem with modding is that almost every aspect of Fallout 4 is governed by “records” containing multiple data points. A mod can override a record to modify one or more of its data points. The catch is that the last mod in the load order “wins” for that record, overwriting all the data points it modifies.
To solve this, many modding tools introduce a “Smash Patch,” which creates a merged record that includes all relevant data points from multiple mods. The user must manually resolve any conflicting data points. Gingas has already done this: the last five mods in the load order are patches, including a Smash Patch covering 159 mods.
The problem arises if one of the patched mods is removed—the patch becomes invalid and doesn’t load, causing the game to fall back on the previous “winning” mod, which no longer merges data points with the other 158. Similarly, if you add a mod that overrides records contained in the patch, you risk breaking mods that depend on that patch.
Fortunately, Mod Organizer includes tools to handle these conflicts. For an introduction, I found Introduction to Mod Organizer 2 and Learning How To Read xEdit very helpful.
If you want more details on how these merges work—though it can be a bit confusing—check out Gingas’s own video on resolving mod conflicts. It appears she did extensive fine-tuning after using these tools, which is why I chose not to recreate the patches but to make manual changes only.
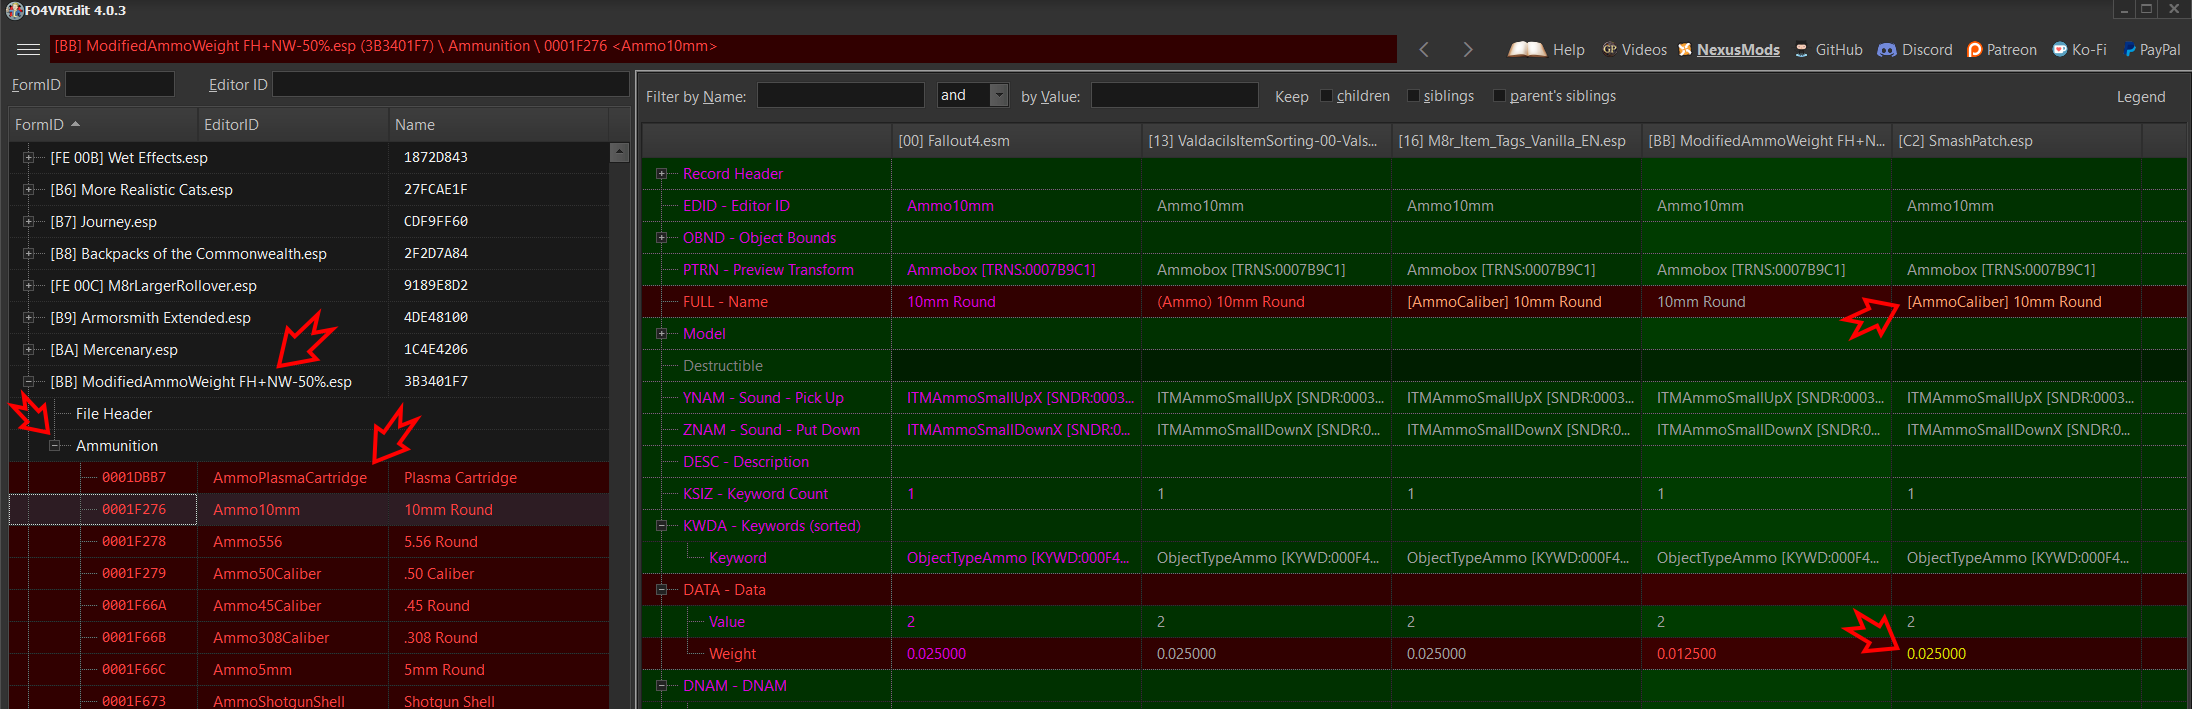
Example: The 10mm ammo record has its “Full – Name” data point modified by two sorting mods, so a smash-patch is created to decide the winner. However, a new “ModifiedAmmoWeight” mod overrides all the 10mm ammo record’s values and breaks the sorting mod. If the new mod loads earlier in the order, its Weight value is overwritten by the Smash Patch and effectively ignored.

Removing Mods
If the removed mod has no ESP plugin or that plugin is not a master dependency for other plugins (patches), it should be safe to remove. But if it does have a plugin and is used as a master, you must handle it correctly.
Step 1: Check if it’s safe to remove a mod
- Select the mod in the left-hand list.
- If the mod has a plugin, it will be highlighted in the plugin list on the right.
- Disable the mod; its plugin should disappear from the list.
- If the “Notification” count in Mod Organizer increases from 1 to 2, it is not safe to remove.

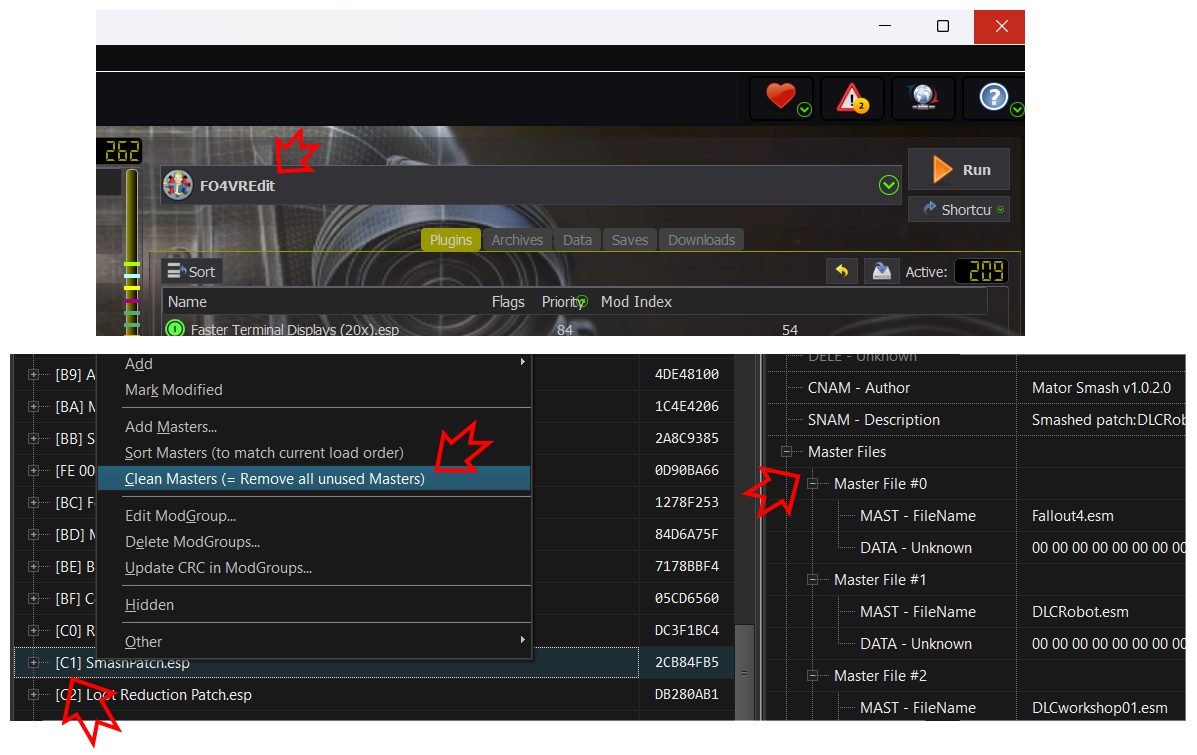
Step 2: Clean SmashPatch
Before doing anything specific to the removed mod(s), I recommend “cleaning unused masters” from SmashPatch because it references 159 masters before cleaning, and only 41 after. I assume it was created with an automated tool that kept references to everything it scanned. This preemptive clean can save headaches if you plan to remove many mods.
- Run
FO4VREditthrough Mod Organizer. - Find
SmashPatch.esptoward the end of the list. - Check the long “Master Files” list on the right.
- Right-click, then click “Clean Masters.”
- Check the now much shorter “Master Files” list.
- Close and save.
Step 3: Handle master dependency
One option is to recreate the patches using Mator Smash or FO4VREdit. However, due to the large number of mods, conflicts, and the uncertainty of what Gingas manually fine-tuned, I don’t feel comfortable doing so without thoroughly verifying that nothing else breaks.
Another option is to use this excellent guide to identify which data points reference the removed mod, remove them manually, and then clean the now-unused master references.
But that can be tedious if you’re removing 30+ mods like I did. So I used a small hack to create dummy masters to replace removed mods. After 20+ hours of play, I haven’t noticed any adverse effects.
Note: This works well for mods that add things (like new weapons). It might not work well for mods that change functionality (like loot reduction), because some changed values may persist in the Smash Patch.
Note2: This is probably horrifying to experienced modders, as I’m sure there are side effects. However, it worked for me and made the game much more enjoyable without requiring another 20 hours of modding research.
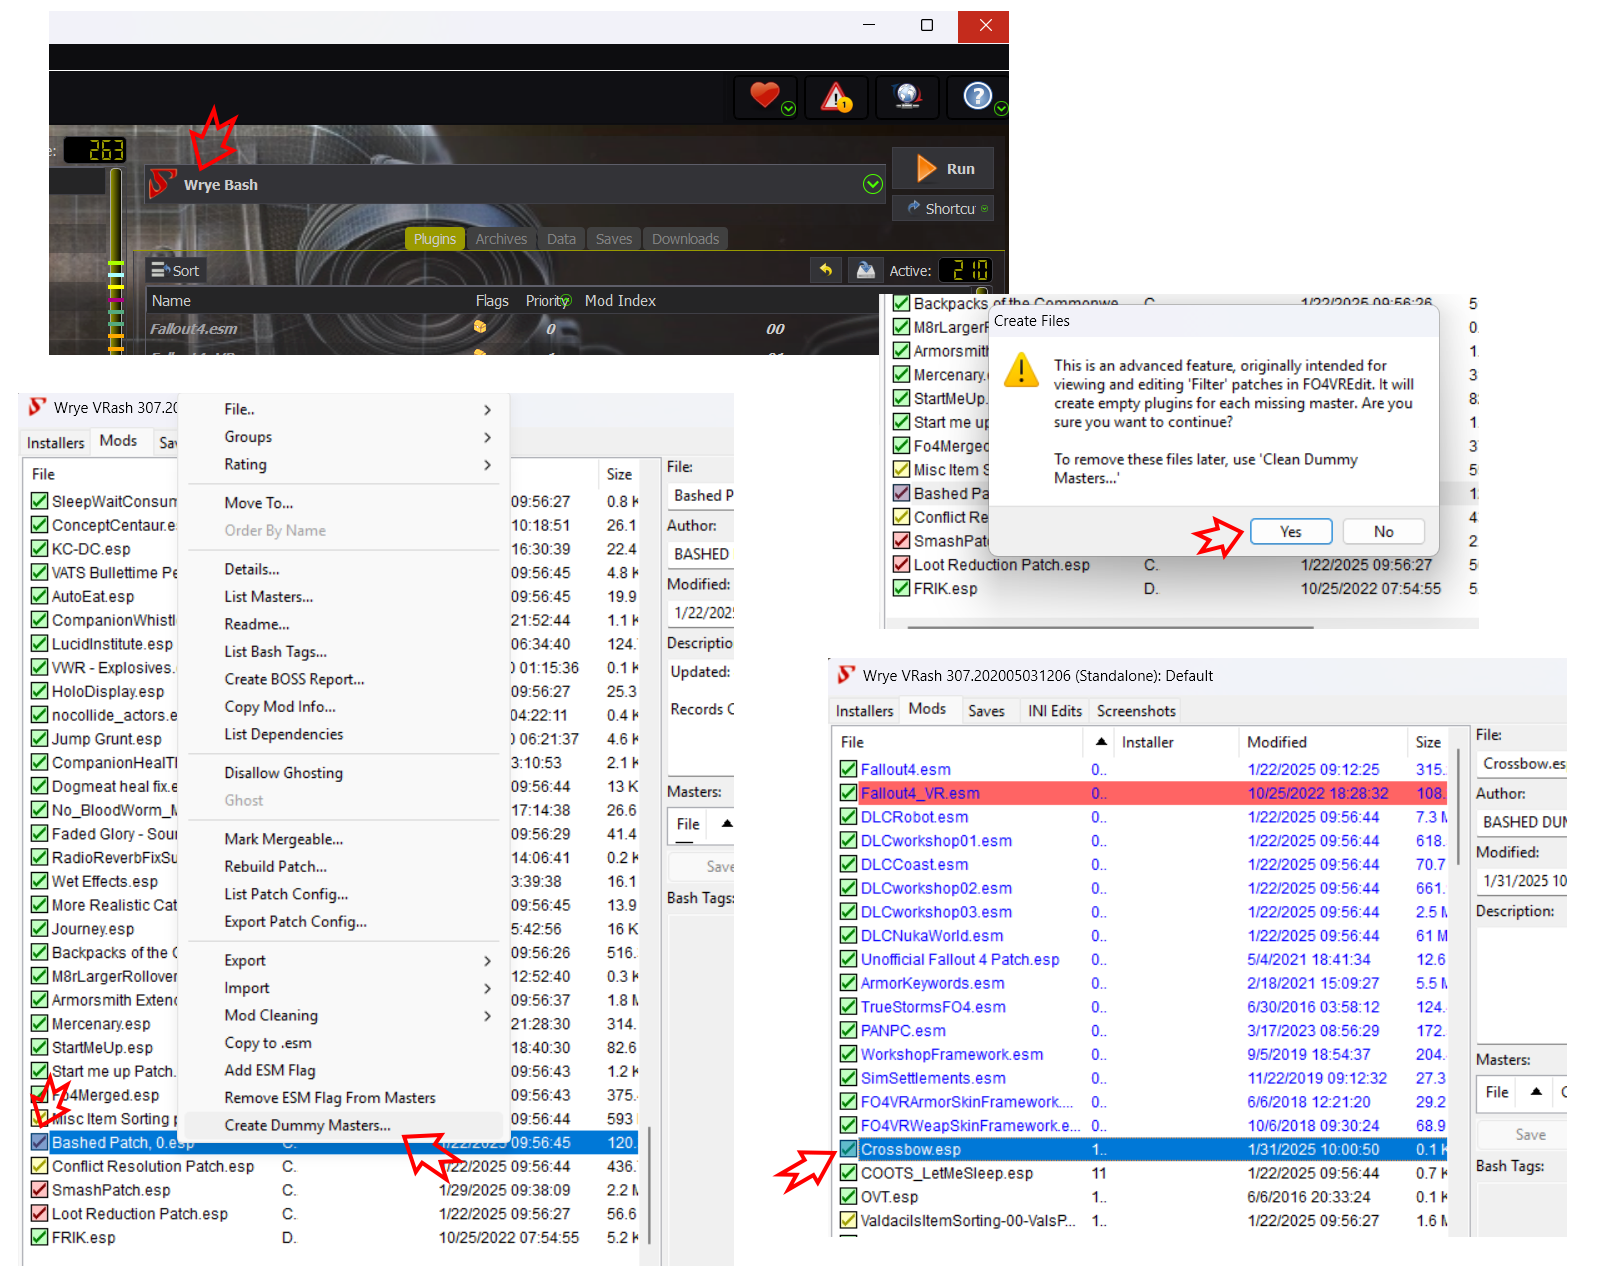
- Run
Wrye Bashthrough Mod Organizer. - Find the problematic plugins marked with a red checkbox.
- Right-click, select Create Dummy Masters…, and click “Yes” (since you definitely know what you’re doing!).
- Enable the newly created plugin at the (almost) top of the list.
- Close Wrye Bash.
- Mod Organizer’s notification count should be back to 1.
Adding Mods
If a mod has a plugin, it might conflict with existing mod plugins. As far as I know, there’s no quick way to know for sure unless you check with FO4VREdit.
- Install and enable the new mod.
- If the mod has an ESP plugin, it will be added at the end of the plugin list.
- Drag the plugin above the patch plugins; you don’t want it automatically overriding them.
Example: Adding a weight reduction mod. - Open
FO4VREdit. Find the new plugin, expand its tree, and check the color of the records. - If any record has a conflict, there’s a problem.
- Click on one of those records.
- Find the conflicting data points on the right.
Example: The added weight reduction mod includes “Ammunition” records, but its values are overridden by the SmashPatch. - Depending on the complexity of the conflict, you can fix it by manually updating the values in the winning plugin column.For example, see the Bulk Editing using Script section for how to handle weight changes.
Note: I’ve only added “simple” mods that were easy to resolve manually.
Manual Records Editing
Manually editing plugin records using FO4VREdit can handle small changes or conflict resolutions after adding/removing mods.
It can be as simple as double-clicking the desired data point, entering the new value, and saving.
You can edit any plugin that modifies a record, including the SmashPatch—just be sure to edit the winning record in the table. See Conflicts: Learning How To Read xEdit for a good intro to FO4VREdit. If you’re interested in learning more, LivelyDismay / Learn-To-Mod has excellent tutorials.
For example, I added “[Settings]” prefixes to FRIK, Virtual Holsters, etc. holotapes so they’d group with the rest of the mod configs in the Pip-Boy’s Misc tab. I also changed water radiation intensity and increased Ammo Crafting resource requirements.
Example: Editing FRIK setting holotape names to add “Settings” so they appear in the same Pip-Boy interface group.
Example: Editing “Virtual Holsters” holotape names to add “Settings.” This required 21 data point edits, as it split 7 locations across 3 groups (unassigned, empty, and full).
Bulk Editing using Script
When you need to do a large number of simple edits, a small Pascal script can help automate it. Pascal was my first programming language (checking calendar..) 30 years ago.. (small heart attack). Fortunately, it’s a very simple language.
I used a script to reduce ammo, food, drink, and scrap weights without adding another mod that might cause conflicts. It is possible to rerun the sorting script in FO4VREdit to recreate the sorting patch after applying weight-reduction mods, but:
- I didn’t feel comfortable doing that without verifying everything.
- I wanted precise control over which items got weight changes (e.g., only scrap, not weapon/armor mods).
Example: Use a script to manually lower ammo, food, drink, and scrap weights.
- Open
FO4VREdit, find the SmashPatch and Loot Reduction Patch plugins. - Select them and right-click.
- Alternativly you can select inner group or individual records
- Click Apply Script…
- Paste change ammo weight script into the window.
- Modify the update values to your liking (set to 0, divide by 10, etc.).
- Click OK. (Save if prompted.) The textbox will close, and the script will run.
- In the right-hand “Messages” tab, you’ll see the script’s log.
- In the left-hand pane, changed values are marked in bold.
- Check the updated weight data values in the records.
- Close FO4VREdit and save changes.

See this repository for many example scripts.
Recommended Changes: Mods
My philosophy is:
- Update only the mods that have significant improvements in their changelogs (and feel safe to do so).
- Remove as many mods as possible that I don’t like, so they don’t introduce side effects.
- Add only small quality-of-life mods that feel absolutely necessary.
Mods to Update
I only updated mods that seemed “safe” and offered meaningful improvements. For some, you can simply hit “replace” when installing; for others, the mod name changed, so you may need to drag it to the same position in the load order and manually remove the old version.
FRIK – Full Player Body with IK
Update 2025: FRIK is currently up-to-date to v75. But it’s always a good idea to make sure it’s till the latest in the future.
Mods to Remove
Some, but not all, of those mods can be deactivated in-game. I’m a purist and believe it’s better to remove them but YOU MUST do it correctly and handling master dependencies as described above!
Stalkers
Random enemy spawns every 30 minutes that instantly hunt you felt very random and unrealistic. It ruined the Fallout feel for me, so I disabled it first. Removing it also solves the issue of being attacked going to or right after leaving the vault.
Sim Settlements
The pre-built settlements are buggy and more annoying than just building a few prefabs for minimal settlement functionality. If you’re not interested in being a raider (a big focus of Conqueror), I highly recommend removing these. I didn’t put much time into building settlements with Sim Settlements, but you’re welcome to experiment with its newer versions if you want. I didn’t want to spend time verifying if it works in VR or conflicts with other mods.
Update 2025: Sim Settlements 2 is amazing and one of the reason I recommend Fallout 4 VR “Mad God Overhaul” Modlist — Fixes and Customization Guide.
See-Through Scopes
The idea is awesome, but the scope zoom and aiming experience are much worse than in vanilla.
- The actual visual zoom is lower than in vanilla. I think of it as “digital” zoom with less clarity, compared to vanilla’s “optical” zoom.
- It’s much harder to align shots due to eye-hand misalignment, jittery crosshairs, and the lack of a “hold breath” ability.

I spent considerable time tweaking INIs to increase the zoom, but it doesn’t seem to work consistently for different scopes, and the effect can be disorienting—possibly due to IPD (eye distance) issues. If you do find a way to get it working, please let me know!
- See-Through-Scopes
- STS fixed
- Better Scopes VR
- VR Weapon Overhaul
- VR Weapon Overhaul – Binoculars
Update 2025: The DOOMBASED Weapons Merged mod has some interesting features that may come down to personal preference. However, it’s still nowhere near the quality of vanilla scopes. If you’re not using DLAA—which unfortunately causes vanilla scopes to crash—I strongly recommend sticking with vanilla scopes for gameplay.
Additional Armor and Weapons
I found the added weapons either lore-unfriendly, unbalanced, or just not fun. I kept the Service Rifle because I had just replayed New Vegas, and it felt appropriate.
- DOOMBASED Weapons Merged VR Patch – Overpowered, not lore-friendly.
- DOOMBASED Weapons Merged (Weapon Pack)
- Fallout 4 VR Compatibility Patch for DOOMBASED Weapons Merged
- Real Throwing Weapons – Just adds clutter.
- Lee Enfield No.4 Mk.1 – Britain’s Finest – Not lore-friendly.
- Chinese officer sword Damascus retexture – No specific reason, just removed.
- Post-apocalyptic homemade weapons – Doesn’t add much.
- Crossbows of the Commonwealth – Removed for personal taste.
Visual/Misc
- VR FPS Stabilizer – Fallout VR – Hard to debug, but I suspected it caused frame drops.
- Illuminated Billboards Lighting – Felt unrealistic in a post-apocalypse.
- Remove Ugly Flat Trash – Without it, the ground looks less boring. Langleys HD Textures helps somewhat.
- Insignificant Object Remover – I don’t think these objects are truly insignificant or affect framerates.
- No Featured Item popup – Not knowing what a bobblehead or magazine grants is annoying.
- Heather Casdin – Too many companions already.
- Backpacks of the Commonwealth – I don’t enjoy inventory management, just unnecessary clutter.
- Backpacks replacer, Backpacks unpacked
- Have a Seat – really unnecessary.
- Be Seated Fallout 4 VR Edition – very annoying extra message box for sitting.
- Take a Load Off – really unnecessary.
- Wait Menu Consumable Item – I didn’t find a reason for it.
- Alternative Female Cinematic Intro – Cool if you’re playing a female character, otherwise optional.
- Ultimate (Main) Menus (Video Replacer) – just why?? the original is so much better.
- Super Mario Mmmm Watcha Say Country Road Take Me Home Death Music Sounds On Ice – really unnecessary.
Mods to Add
Professional Ammo Crafting
My solution to the ammo scarcity issues introduced by the loot-reduction changes in this modlist. I don’t feel comfortable removing or tweaking Gingas’s extensive loot changes, so this ammo crafting mod is more straightforward.
The ammo crafting mod is more balanced than the Workshop Ammunition Plant, but it still felt too “easy.” To adjust this, I used FO4VREdit to reduce the amount of crafted ammo to about 30% or increase resource requirements by 3x. You can also remove recipes, add perk conditions, and make other tweaks to better match your playstyle.
Example: Reducing 10mm crafted ammo from 30 to 10 for the same amount of resources.
Update 2025: Gingas added Convenient Ammo Crafting Extended. I haven’t tested it so can’t commend.
Misc
- Map Tweaks VR – An absolute must-have to make the map usable by setting a default zoom-out.
- VR Handmade Reflex Sights – The vanilla reflex sights are useless in VR. (Note: If you didn’t remove VR Weapon Overhaul, that mod also improves reflex sights.)
- Quieter Player Voice – Helps with the game’s bug where NPC dialog volume is too low. I used the 30% variant while raising dialog in the game’s audio settings.
- Survival XP Gain Same As Other Difficulties – Reduces Survival’s default 2x XP gain. I edited it in FO4VREdit to 0.9x, slowing level progression.
Recommended Changes: Graphics
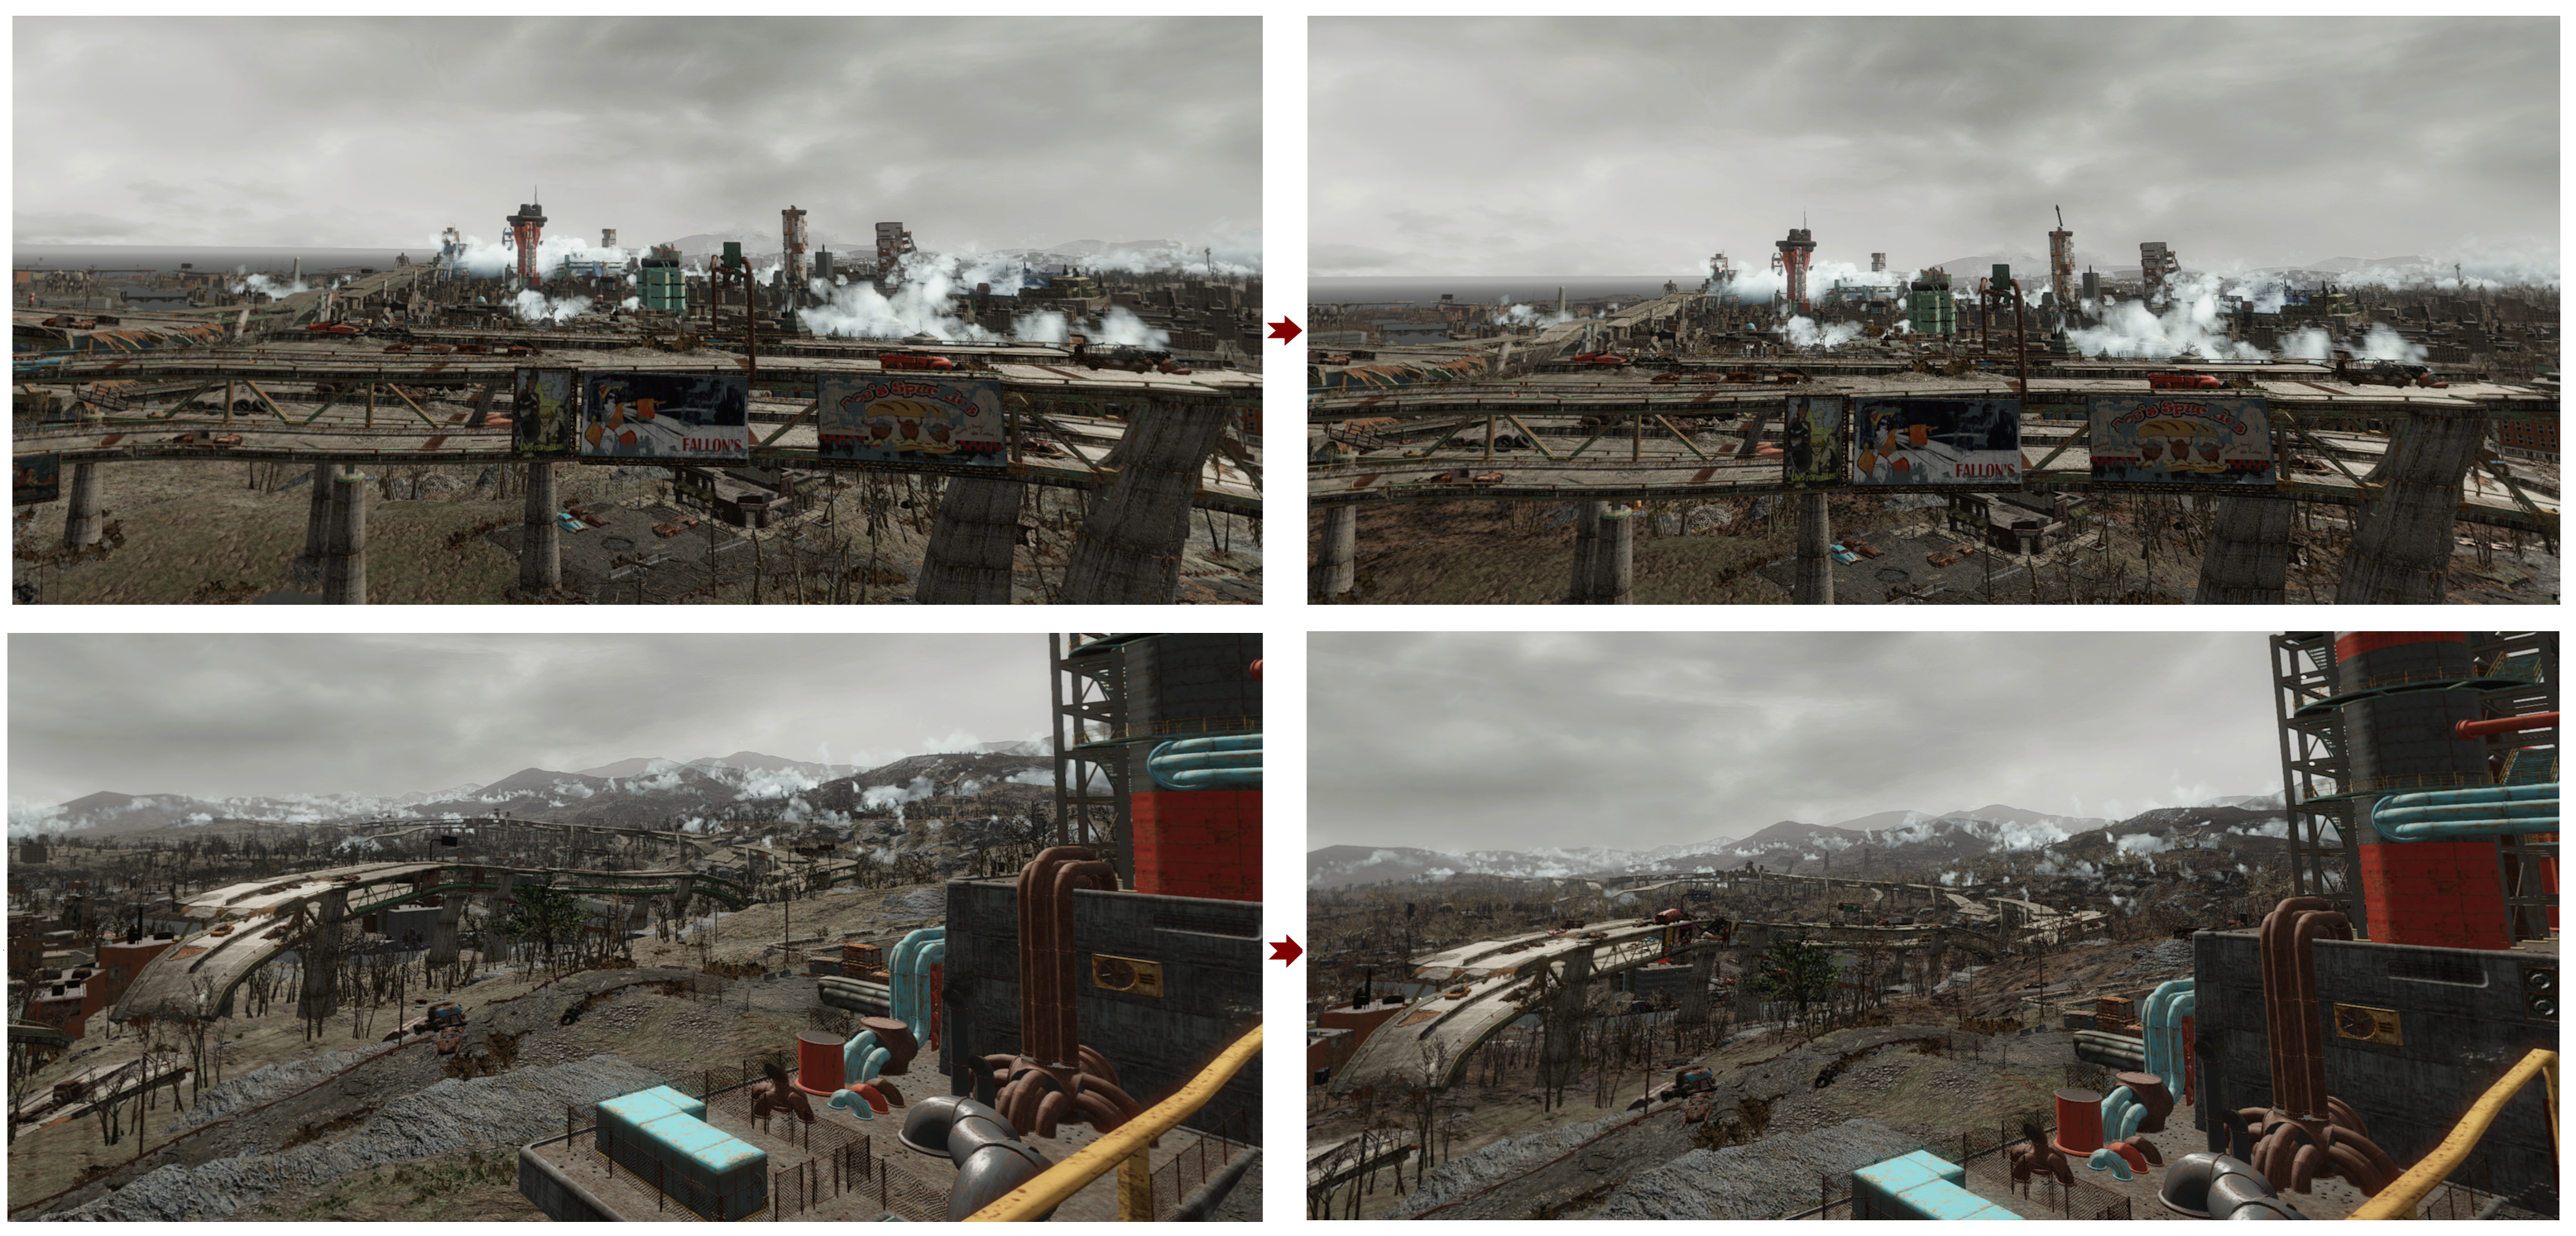
Fo4VR will never look as good or run as smoothly as Half-Life Alyx — we just need to accept that. IMHO, Gingas did an amazing job selecting textures and lighting mods with a focus on smooth framerates. I’ve spent many hours testing various HD texture packs and concluded it’s often not worth it. Eventually, I did add one HD texture mod, increased distant area level of detail (LOD), and tweaked a few INI values. I still get occasional frame drops, terrain loading stutter, and night fog issues that existed, AFAIK, even before my changes. That’s just Fallout 4 VR, thanks Todd!
My Setup
- AMD Radeon RX 7900 XT GPU
- AMD Ryzen 7 7800X3D @ 4.2GHz, 32 GB RAM
- Oculus Quest 3
I used fpsVR to measure performance. In my subjective experience, you want mostly green graphs and <1% reprojection.
Example: Stataring experience with GPU utilization frequently at 100% usage and >2% reprojection.
Misc INIs Tweaks
In fallout4custom.ini: Makes the UI text crisper (menus, notifications, dialogs, etc.). I didn’t see any effect on other visuals. Going beyond 2048 yields only marginal text clarity improvements at a noticeable performance cost. Doesn’t make sense to me but it is what it is.
[VRUI]
iVRUIRenderTargetHeight=2048
iVRUIRenderTargetWidth=2048

In fallout4prefs.ini: Not sure if it helps in VR, but some folks claim it does. I included it just in case.x
[Display]
uPipboyTargetHeight=1400
uPipboyTargetWidth=1752
LOD and Distant Details
The most significant immersion improvement, absolutely worth trying if your system can handle it.
Update TerrainManager in fallout4prefs.ini:
[TerrainManager]
fTreeLoadDistance=60000.0000
fBlockMaximumDistance=180000.0000
fBlockLevel2Distance=100000.0000
fBlockLevel1Distance=60000.0000
fBlockLevel0Distance=30000.0000
fSplitDistanceMult=1.5000
Makes far-off terrain, trees, and buildings more visible so the world doesn’t look so empty. See this website for details.

Install an LOD Mod
Update 2025: I no longer recommend using those LOD mods, as they don’t account for roads, ground, and other texture changes. In GingasVR HD, the Forest mod already includes LOD for trees, but it doesn’t cover the other texture changes, so the result is mixed. If you’re not using the Forest mod, I recommend checking out my MGO LODs, which are based on the same HD textures as GingasVR. Alternatively, you can follow the LOD Generation Instructions to create the perfect LODs for your own modlist.
These significantly improve distant objects, enhancing the terrain INI changes.
It does affect framerate, but for me it’s acceptable. It’s easy to add/remove, so give it a shot if you want more detailed horizons.
Note: The most annoying side effect is the slow loading of terrain textures, which can make mid-range terrain look confusing and even dizzying. If anyone knows how to fix it, please let me know!
Recommended Changes: Survival
Update 2025: Honestly, if you’re looking for balanced gameplay, I recommend starting with the Fallout 4 VR “Mad God Overhaul” Modlist — Fixes and Customization Guide. This keeps the vanilla difficulty unchanged, and you can build from there.
I personally love survival gameplay and have, in fact, increased the difficulty for myself by:
- Reducing player damage from 1x to 0.75x. I felt some enemies were too easy to kill. Yes, this makes them more “bullet spongy,” but it also makes headshots far more important, making accuracy in firefights more rewarding.
- Reducing the XP generation factor from 2x (default in Survival) to 0.9x. It slows level progression, keeping the game more challenging for longer.
What I didn’t find interesting at all is inventory weight management and ammo scarcity. To address that, I:
- Increased carry capacity by 40 using a console command.
- Reduced ammo and food weight to 50% and scrap item weights to 20%. (details)
- Added Ammo Crafting. Changing or removing loot reduction from Gingas’s configuration is risky, and this ammo crafting mod, with minor changes, feels balanced and lore-friendly.
Not interested in Survival?
I didn’t test at all, but I believe changing the difficulty from Survival will simply work if you make a few changes to the modlist:
- Add Ammo Crafting to handle ammo scarcity issues, since enemies will require more shots to kill (reverting reduced loot changes is risky).
- Probably remove Radiation Overhaul since it makes radiation much more deadly.
- Disable Journey’s fast-travel restriction using its settings holotape.
- Reinstall HUIDE_VR if you want the helpful HUD back.
Cheers and good luck!

[…] Below are the steps I took to customize the list, similar to my previous GingasVR Essentials Overhaul Customization Guide. […]